
SpringBoot
新建SpringBoot项目
文件–>新建–>项目
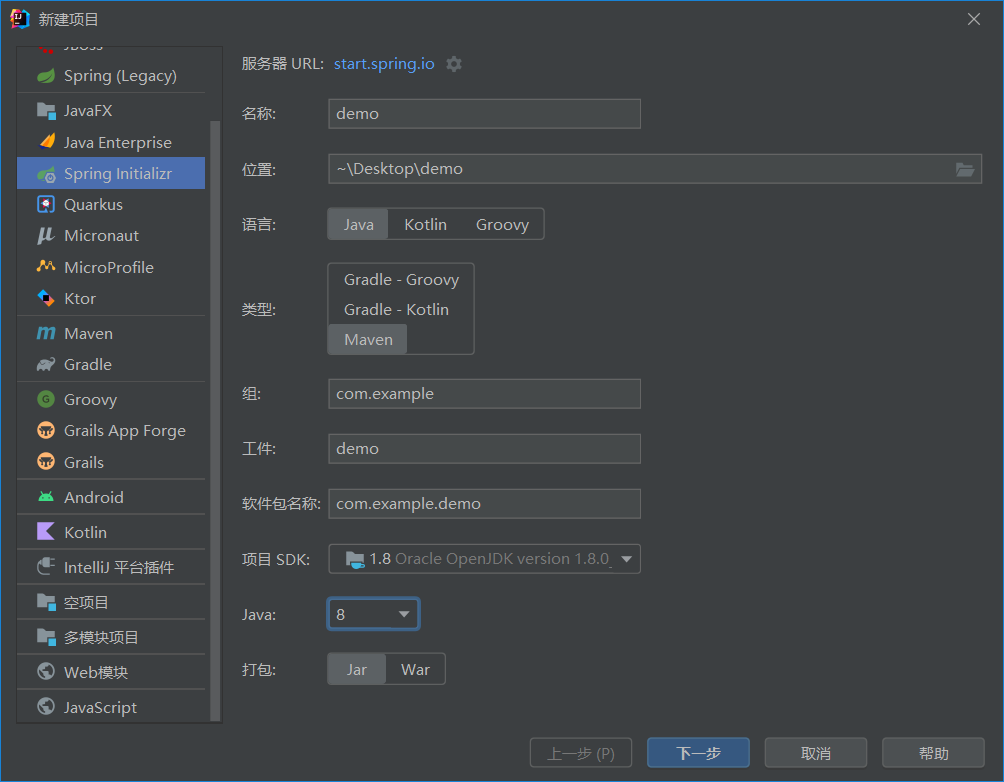

基础配置
配置格式
SpringBoot提供了多种属性配置方法
application.properties
1
server.port=80
application.yml
1
2
server:
port:81application.yaml
1
2
server:
port:81优先级:有上到下
yaml文件
示例:
1 | enterprise: |
单个数据用变量名+冒号空格后面接数据表示
一对多数据(数组)用-加空格表示
注释使用#
使用yaml中定义的属性值
- 通过@value引入
创建资源文件application.yaml
1 | lesson: SpringBoot |
在Spring中使用
1 |
|
使用pojo(最常用)
Enterprise.java
1
2
3
4
5
6
7
8
9
10
11
12
13
14
15
16
17
18
19
20
21
22
23
24
25
26
27
28
29
30
31
32
33
34
35
36
37
38
39
40
41
42
43
44
45
46
47
48
49
50
51
52
53
54
55
56
57
58
59
60package com.example.domain;
import org.springframework.boot.context.properties.ConfigurationProperties;
import org.springframework.context.annotation.Configuration;
import org.springframework.stereotype.Component;
import java.util.Arrays;
import java.util.StringJoiner;
public class Enterprise {
private String name;
private Integer age;
private String tel;
private String[] subject;
public String toString() {
return new StringJoiner(", ", Enterprise.class.getSimpleName() + "[", "]")
.add("name='" + name + "'")
.add("age=" + age)
.add("tel='" + tel + "'")
.add("subject=" + Arrays.toString(subject))
.toString();
}
public String getName() {
return name;
}
public void setName(String name) {
this.name = name;
}
public Integer getAge() {
return age;
}
public void setAge(Integer age) {
this.age = age;
}
public String getTel() {
return tel;
}
public void setTel(String tel) {
this.tel = tel;
}
public String[] getSubject() {
return subject;
}
public void setSubject(String[] subject) {
this.subject = subject;
}
}运行
1
2
3
4
5
Enterprise enterprise;
//直接打印enterprise对象
System.out.println(enterprise);运行结果:
Enterprise[name=’itcast’, age=16, tel=’1654654’, subject=[Java, 前端, 大数据]]
多环境启动
设置多个mysql地址或者多个端口
1 | #设置默认启动环境 |
使用命令更改已打包的端口
1 | java -jar springboot.jar --spring.profiles.active=test |
多环境开发兼容(maven与boot协作)
在环境中如果maven和boot都有profile属性则优先执行maven中的设置
那如何让二者进行分工协作呢?
我们可以让pom来命令.yaml文件具体执行哪一个环境
示例:如何切换端口
- pom.xml
1 | <profiles> |
但是pom中起的别名只能在pom中使用,所以我们要安装一个插件
1 | <build> |
- yaml
1 | #设置默认启动环境 |
最后运行结果为执行81端口
配置文件层级
配置文件分类
SpringBoot中4级配置文件
- 1级: file : config/application.yml 【最高】
- 2级: file : application.yml
- 3级: classpath: config/application.yml
- 4级: classpath: application.yml 【最低】
作用:
- 1级与2级留做系统打包后设置通用属性
- 3级与4级用于系统开发阶段设置通用属性
Springboot整合mybatis
以通过id查找数据为例
- 在yaml文件中配置数据库
1 | spring: |
BookDao
终点注意Mapper,没有了扫描包,springboot会自动识别mapper的自动代理提供给调用类使用
1 |
|
- 测试类
1 |
|
Swagger
介绍
使用Swagger你只需要按照它的规范去定义接口及接口相关的信息,再通过Swagger衍生出来的一系列项目和工具,就可以做到生成各种格式的接口文档,以及在线接口调试页面等等。
knife4j是为java MVC框架集成的swagger
具体用法
导入knife4j依赖
1
2
3
4
5<dependency
<groupId>com.github.xiaoymin</groupId>
<artifactId>knife4j-spring-boot-starter</artifactId>
<version>3.0.2</version>
</dependency>在webmcvconfig中
1
2
3
4
5
6
7
8
9
10
11
12
13
14
15
16
17
public Docket createRestApi(){
return new Docket(DocumentationType.SWAGGER_2)
.apiInfo(apiInfo())
.select()
.apis(RequestHandlerSelectors.basePackage("com.itheima.reggie.contraller"))
.paths(PathSelectors.any())
.build();
}
private ApiInfo apiInfo(){
return new ApiInfoBuilder()
.title("瑞吉外卖")
.version("1.0")
.description("瑞吉外卖接口文档")
.build();
}让前端接管
1
2
3
4
5
6
7
8
protected void addResourceHandlers(ResourceHandlerRegistry registry){
log.info("开始进行静态资源映射");
registry.addResourceHandler("doc.html").addResourceLocations("classpath:/META-INF/resources/");
registry.addResourceHandler("/webjars/**").addResourceLocations("classpath:/META-INF/resources/webjars/");
registry.addResourceHandler("/backend/**").addResourceLocations("classpath:/backend/");
registry.addResourceHandler("/front/**").addResourceLocations("classpath:/front/");
}前端放行
1
2
3
4
5
6
7
8
9
10
11
12String[] urls=new String[]{
"/employee/login",
"/employee/logout",
"/backend/**",
"/front/**",
"/user/**",
"/common/**",
"/doc.html",
"/webjars/**",
"/swagger-resources",
"/v2/api-docs"
};
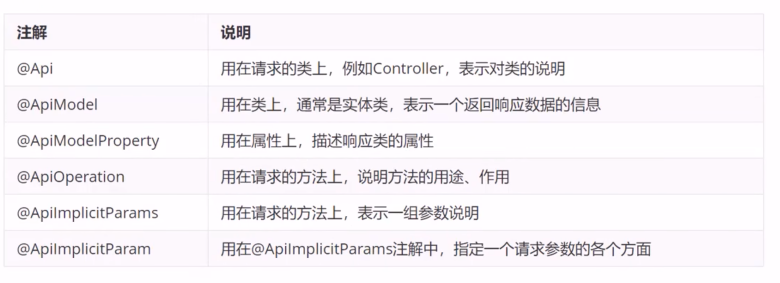
常用注解