Vue框架
Vue基础
Vue简介
是一款用于构建用户界面的渐进式框架
安装
vue下载地址:https://unpkg.com/vue@3.2.36/dist/vue.global.js
安装脚手架vite
1
2
3
4
5
6
| npm init vite@latest vue-begin -- -- template vue
运行
cd 项目名
npm install
npm run dev
|
安装jquery库
1
| npm install jquery --save-dev
|
安装bootstrap
1
| npm install --save-dev bootstrap@3.4.1
|
安装Element-UI
要安装 Element UI,需要先确保你的项目使用了 Vite 作为构建工具。如果还没有安装 Vite,可以在终端中运行以下命令:
然后,在你的项目目录下打开终端,运行以下命令来安装 Element UI:
1
| npm install element-plus --save
|
安装完成后,在 main.js 文件中引入 Element UI:
1
2
3
4
5
| import { createApp } from 'vue'
import ElementPlus from 'element-plus'
import 'element-plus/theme-chalk/index.css';
createApp(App).use(ElementPlus).mount('#app')
|
现在,Element UI 已经被成功地安装并引入到你的项目中了。
安装并使用jquery
在vite中不具有使用jquery的配置,因此只能通过插件将webpack的jquery注入
1
2
| 安装插件
npm i jquery @rollup/plugin-inject -S
|
基础设置
配置端口
在vite.config中配置
1
2
3
4
5
6
| export default defineConfig({
plugins: [vue()],
server: {
port: 7070
}
})
|
连接拦截
拦截局域网中想要连接所有地址
1
2
3
4
5
6
7
| export default defineConfig({
plugins: [vue()],
server: {
port: 7070,
host: "0.0.0.0"
}
})
|
配置代理
为了避免前后端服务器联调时, fetch、xhr请求产生跨域问题,需要配置代理,同样是修改项目根目录下vite.config.ts
1
2
3
4
5
6
7
8
9
10
11
12
13
14
15
16
| import { defineConfig } from 'vite'
import vue from '@vitejs/plugin-vue'
// https://vitejs.dev/config/
export default defineConfig({
plugins: [vue()],
server: {
port: 7070,
proxy: {
'/api': {
target: 'http://localhost:8080',
changeOrigin: true
}
}
}
})
|
vue的特性
Vue框架的特性主要体现在两个方面
- 数据驱动视图
在使用vue的页面中,vue会监听数据的变化,从而自动重新渲染结构
- 双向数据绑定
vue基本使用
导入vue.js的script的脚本文件
在页面中声明一个将要被vue所控制的DOM区域
创建vm实例化对象
1
2
3
4
5
6
7
8
9
10
11
|
const app = Vue.createApp({
data() {
return {
message: 'Hello Vue!!'
}
}
})
app.mount('#wai')
|
创建根组件(应用实例)
1
2
3
4
5
6
7
8
9
10
11
12
13
14
15
16
17
| import { createApp } from 'vue'
Const const=createApp({
})
const app = Vue.createApp({})
app.component('runoob', {
template: '<h1>自定义组件!</h1>'
})
app.mount('#app')
|
我们传入的createApp实际上是一个根组件,其他的所有组件都隶属于这个根组件
模板语法
文本插值
最基本的格式就是用双花括号
1
2
3
4
5
6
7
8
9
10
11
| <span>Message: {{ msg }}</span>
export default{
name:'HelloWorld',
data(){
return{
msg:"看见我就对了"
}
}
}
|
插入原始HTML
使用v-html插入原始html
1
2
3
4
5
6
7
8
9
10
11
| <p v-html="link"></p>
export default{
name:'HelloWorld',
data(){
return{
link:"<a href='http://www.baidu.com'>百度</a>"
}
}
}
|
Attribute 绑定
可以动态更改id、class和自定义名称 :id :class
1
2
3
4
5
6
7
8
9
10
11
| <h1 :id="hao">{{ msg }}</h1>
export default{
name:'HelloWorld',
data(){
return{
msg:"看见我就对了",
hao:"ma"
}
}
}
|
使用js表达式
vue已经全面支持js完整表达式,可以在双括号中进行js运算和判断
1
2
3
4
5
6
7
| {{ number + 1 }}
{{ ok ? 'YES' : 'NO' }}
{{ message.split('').reverse().join('') }}
<div :id="`list-${id}`"></div>
|
v-bind属性绑定
v-bind指令主要用于响应式的更新html的属性
一般我们要想在元素节点的属性上绑定vue的data数据是不可以直接使用双花括号插入值语法来使用
如果我们想让dom属性节点与data数据绑定响应就需要使用v-bind指令
例如:为h1添加title属性
1
2
3
4
5
6
7
8
9
10
11
12
13
14
15
16
17
| <body>
<div>
<h1 :title="tit">这是一个h1</h1>
</div>
</body>
<script src="../js/vue3.js"></script>
<script>
const app=Vue.createApp({
data(){
return{
tit:"abcd"
}
}
})
app.mount("div")
</script>
|
例如:添加class类active
1
2
3
4
5
6
7
8
9
10
11
12
| <div class="static" :class="{ active: isActive, 'text-danger': hasError }"></div>
data() {
return {
classObject: {
active: true,
'text-danger': false
}
}
}
则等同于class="static isActice"
|
条件渲染
v-if
只有当v-if条件为真时才进行渲染,否则不显示
1
2
3
4
5
6
7
8
9
10
| <h1 v-if="flag">Vue is awesome!</h1>
export default{
name:'HelloWorld',
data(){
return{
flag:true
}
}
}
|
v-else
用于为v-if设置另一个选项
1
2
3
4
5
6
7
8
9
10
11
12
13
14
| <button @click="awesome = !awesome">Toggle</button>
<h1 v-if="awesome">Vue is awesome!</h1>
<h1 v-else>Oh no 😢</h1>
export default{
name:'HelloWorld',
data(){
return{
flag:true
}
}
}
|
v-show和v-if的区别
v-if在设置false之后是见不到这个DOM元素的,而v-show则会相当于加了display属性none一样
v-for列表渲染
用v-for将一个数组映射为一组元素
v-for指令需要使用item in items形式的特殊语法,其中items是源数据数组,而item则是被迭代的数组元素的别名
1
2
3
4
5
6
7
8
9
10
11
12
13
14
15
16
17
18
19
20
21
22
23
24
| <ul>
<li v-for="item in aaa" :key="item.id">
{{item.title}}
</li>
</ul>
export default{
name:'HelloWorld',
data(){
return{
aaa:[{
id:1,
title:"第一个列表"
},{
id:2,
title:"第二个列表"
},{
id:3,
title:"第三个列表"
}]
}
}
}
|
例子:点击添加数据
1
2
3
4
5
6
7
8
9
10
11
12
13
14
15
16
17
18
19
20
21
22
23
24
25
26
27
28
29
30
31
32
33
34
35
36
37
38
39
40
41
42
43
44
45
46
47
48
49
50
51
52
53
54
55
56
57
58
59
60
61
62
63
64
65
66
67
| <body>
<div id="center">
<button @click="add">添加</button>
<button @click="del">删除</button>
<table>
<tr>
<td>班级</td>
<td>姓名</td>
<td>性别</td>
<td>年龄</td>
</tr>
<tr v-for="item in students">
<td>{{item.id}}</td>
<td>{{item.name}}</td>
<td>{{item.age}}</td>
<td>{{item.sex}}</td>
</tr>
</table>
</div>
</body>
<script src="../js/vue3.js"></script>
<script>
window.onload = function () {
const app = Vue.createApp({
data() {
return {
students: [{
id: '001',
name: "alice",
age: 18,
sex: 'female'
},
{
id: '002',
name: "marry",
age: 19,
sex: 'female'
},
{
id: '003',
name: "json",
age: 20,
sex: 'male'
}]
}
},
methods: {
add() {
var user = {
id: '004',
name: '张三',
age: '21',
sex: '男'
}
this.students.push(user)
},
del(){
this.students.pop()
}
}
})
app.mount("#center")
}
</script>
|
事件处理
使用@+事件进行绑定,methods里面写函数
1
2
3
4
5
6
7
8
9
10
11
| <button @click="dianji">按钮</button>
<button @click="++num">按钮{{num}}</button>
export default{
name:'HelloWorld',
methods:{
dianji(){
num+=1
}
}
}
|
表单输入绑定
v-model设置表单双向绑定(输入什么就获取什么),v-model=”huoqv.lazy”在失去焦点时获取内容 .number自动将输入的内容转化为数字 .trim自动去除两端的空格
1
2
3
4
5
6
7
8
9
10
11
| <input type="text" v-model="huoqv">
<p>{{huoqv}}</p>
export default{
name:'HelloWorld',
data(){
return{
huoqv:""
}
}
}
|
事件处理
事件修饰符
.stop:点击事件将停止传递.prevent:点击超链接之类不再重新加载.self:当有多个父级子级时只有点击它本身才回触发.capture:谁有该事件修饰符,就先触发谁.once:只触发一次.passive:事件的默认行为,立即执行无需等待
1
2
3
4
5
6
7
| <div id="app">
<div style="width: 500px; height: 500px; background: red;" @click.stop="clickdiv1">
<div style="width: 300px; height: 300px; background: blue;" @click.stop="clickdiv2">
</div>
</div>
</div>
|
计算属性
用于处理一些复杂逻辑运算
1
2
3
4
5
6
7
8
9
10
11
12
13
14
15
16
17
18
19
20
21
22
23
24
25
26
27
28
29
30
| <body class="body">
<input type="text" v-model=str1 ><br>
<input type="text" v-model=str2 >
<h2>{{hn}}</h2>
</body>
<script>
const app = Vue.createApp({
data() {
return {
str1: '',
str2: ''
}
},
computed: {
hn: {
get() {
return (this.str1.toUpperCase() + " " + this.str2.toUpperCase()).split('').reverse().join('');
},
set(newnum){
var new1 = newnum.split(" ")
this.str1=new1[0]
this.str2=new1[1]
}
}
}
})
app.mount(".body")
</script>
|
监听属性
1
2
3
4
5
6
7
8
9
10
11
12
13
14
15
16
17
18
19
20
21
22
23
24
25
26
27
28
29
30
31
32
33
34
35
36
| <body>
<div id="div1">
<h2>今天天气是{{info}}</h2>
<button @click="changWeacher">切换天气</button>
<h2>今天天气是{{weather}}</h2>
<button @click="changWeacher">切换天气</button>
</div>
</body>
<!-- 侦听属性watch:
1.当被侦听的属性发生改变时,会自动去执行回调属性 -->
<script>
const con=Vue.createApp({
data(){
return{
isHot:true,
weather:""
}
},
methods:{
changWeacher(){
this.isHot=!this.isHot
}
},
watch:{
isHot:{
handler(newVal,oldVal){
this.weather=newVal?"炎热":"凉爽"
},
immediate:true
}
}
})
con.mount("#div1")
|
过滤器filter(vue3弃用)
过滤器作用
用来格式化数据的一个函数。过滤器不会修改原始数据,它的作用是过滤数据,就是对数据进行加工处理并返回处理后的数据,比如做一些数据格式上的修改,状态修改等。
过滤器分为两种
组件内的过滤器(组件内有效)
全局过滤器(所有组件共享)
定义过滤器
过滤器的使用
- 先注册,后使用
- 组件内 filters:{过滤器:fn} fn内通过return返回最终的数据
- 全局Vue.filter(‘过滤器名’,fn) fn内通过return返回最终的数据
- 使用{{数据 | 过滤器名}} 管道符 | 右边是过滤器名称,即文本功能函数
1
2
3
4
5
6
7
8
9
10
11
12
13
14
15
16
17
18
19
20
21
22
23
24
25
26
27
28
29
30
31
32
|
<template>
  <div class="test">
    <p>{{price}}</p>
    <p>{{price | filter_addPricePrefix}}</p>
    <p>{{price | filter_addPricePrefix |filter_addPriceSuffix}}</p>
  </div>
</template>

<script>
export default {
  data() {
    return {
      price: 100
    };
  },
  filters: {
    filter_addPricePrefix(value) {
      return "¥" + value;
    },
    filter_addPriceSuffix(value) {
      return value + "元";
    }
  }
};
</script>

<style lang="scss" scoped>
.test {
  color: black;
}
</style>
|
过渡和动画
过渡
进入(显示,创建)
v-enter-from 进入前
v-enter-active 进入中
v-enter-to 进入后
离开(隐藏,移除)
v-leave-from 离开前
v-leave-active 离开中
v-leave-to 离开后
这里的v指的是默认前缀如果transition标签中设置了name属性可替代为name-enter-from
1
2
3
4
5
6
7
8
9
10
11
12
13
14
15
16
17
18
19
20
21
22
23
24
25
26
27
28
29
30
31
32
33
34
| <head>
<style>
.dong-enter-active{
transition: all .3s ease;
}
.dong-leave-active {
transition: all .8s cubic-bezier(1.0, 0.5, 0.8, 1.0);
}隐藏中的过度
.dong-enter-from, .dong-leave-to{
transform: translateX(10px);
opacity: 0;
}
</style>
</head>
<body>
<div id="databinding">
<button v-on:click="show = !show">点我</button>
<transition name="dong">
<p v-if="show">动画实例</p>
</transition>
</div>
</body>
<script src="../js/vue3.js"></script>
<script type="text/javascript">
const vm = Vue.createApp({
data(){
return{
show: true
}
}
});
vm.mount("body")
</script>
|
动画
1
2
3
4
5
6
7
8
9
10
11
12
13
14
15
16
17
18
19
20
21
22
23
24
25
26
27
28
29
30
31
32
33
34
35
36
37
38
39
40
| <style>
.dong-enter-active {
animation: bounce-in .5s;
}
.dong-leave-active {
animation: bounce-in .5s reverse;
}
@keyframes bounce-in {
0% {
transform: scale(0);
}
50% {
transform: scale(1.5);
}
100% {
transform: scale(1);
}
}
</style>
</head>
<body>
<div id="databinding">
<button v-on:click="show = !show">点我</button>
<transition name="dong">
<p v-if="show">闫雨萌</p>
</transition>
</div>
</body>
<script src="../js/vue3.js"></script>
<script type="text/javascript">
const vm = Vue.createApp({
data(){
return{
show: true
}
}
});
vm.mount("body")
</script>
|
通过自定义动画

1
2
3
4
5
6
7
8
9
10
11
12
13
14
15
16
17
18
19
20
21
22
23
24
25
26
27
28
29
30
31
32
| <!DOCTYPE html>
<html>
<head>
<meta charset="utf-8">
<title></title>
<link href="https://cdn.jsdelivr.net/npm/animate.css@3.5.1" rel="stylesheet" type="text/css">
</head>
<body>
<div id = "databinding">
<button v-on:click = "show = !show">点我</button>
<transition
name="custom-classes-transition"
enter-active-class="animated tada"
leave-active-class="animated bounceOutRight"
>
<p v-if="show">闫雨萌</p>
</transition>
</div>
</body>
<script src="../js/vue3.js"></script>
<script type="text/javascript">
const vm = Vue.createApp({
data(){
return{
show: true
}
}
});
vm.mount("body")
</script>
</html>
|
结合Velocity.js实现动画
1
2
3
4
5
6
7
8
9
10
11
12
13
14
15
16
17
18
19
20
21
22
23
24
25
26
27
28
29
30
31
32
33
34
35
36
37
38
39
40
41
42
43
44
45
| <head>
<meta charset="UTF-8">
<meta http-equiv="X-UA-Compatible" content="IE=edge">
<meta name="viewport" content="width=device-width, initial-scale=1.0">
<title>Document</title>
</head>
<body>
<div>
<button @click="show=!show">点击</button>
<transition @before-enter="beforeEnter" @enter="enter" @leave="leave" v-bind:css="false">
<p v-if="show">文字动画效果</p>
</transition>
</div>
</body>
<script>
const app=Vue.createApp({
data(){
return{
show:false
}
},
methods:{
beforeEnter(el){
el.style.opacity=0
el.style.transformOrigin='left'
el.style.color='red'
},
enter(el,done){
Velocity(el,{opacity:1,fontSize:'1.4em'},{duration:300})
Velocity(el,{fontSize:'1em'},{complete:done})
},
leave(el,done){
Velocity(el,{translateX:'15px',rotateZ:'50deg'},{duration:300})
Velocity(el,{rotateZ:'100deg'},{loop:1})
Velocity(el,{rotateZ:'45deg',translateY:'30px',translateX:'30px',opacity:0},{complete:done})
}
}
})
app.mount("div")
</script>
|
组件基础
创建组件并赋值
1
2
3
4
5
6
7
8
9
10
11
12
13
14
15
16
17
18
19
20
21
22
23
24
25
26
27
28
29
30
31
| <body>
<div id="app">
<button-counter></button-counter>
</div>
</body>
<script>
const app = Vue.createApp({
})
app.component('button-counter', {
data() {
return {
aaa:[{
title:"火锅"
},{
title:"烧烤"
},{
title:"小龙虾"
},{
title:"牛排"
}]
}
},
template: `
<ul :style="'background-color:#80c7ec'">
<li v-for='item in aaa'>{{item.title}}</li>
</ul>`
})
app.mount("#app")
|
Vue单文件组件,是一种特殊的文件格式,它允许将vue组件的模板、逻辑样式封装在单个文件中
1
2
3
4
5
6
7
8
9
10
11
12
13
14
15
16
17
18
19
20
21
22
23
24
25
26
27
28
29
30
31
32
33
34
35
36
37
| <script >
import learn from './components/learn.vue' //this
export default{
name:"App",
components: { learn } //this
}
</script>
<template>
<div>
<a href="https://vitejs.dev" target="_blank">
<img src="/vite.svg" class="logo" alt="Vite logo" />
</a>
<a href="https://vuejs.org/" target="_blank">
<img src="./assets/vue.svg" class="logo vue" alt="Vue logo" />
</a>
<HelloWorld msg="Vite + Vue" />
<learn/> <!--this-->
</div>
</template>
<style scoped>
.logo {
height: 6em;
padding: 1.5em;
will-change: filter;
}
.logo:hover {
filter: drop-shadow(0 0 2em #646cffaa);
}
.logo.vue:hover {
filter: drop-shadow(0 0 2em #42b883aa);
}
</style>
|
加载组件
第一步:引入组件 import learn from ‘./components/learn.vue’
第二步:挂载组件 export default{
name:”App”,
components: { learn } //this
}
第三步:显示挂件
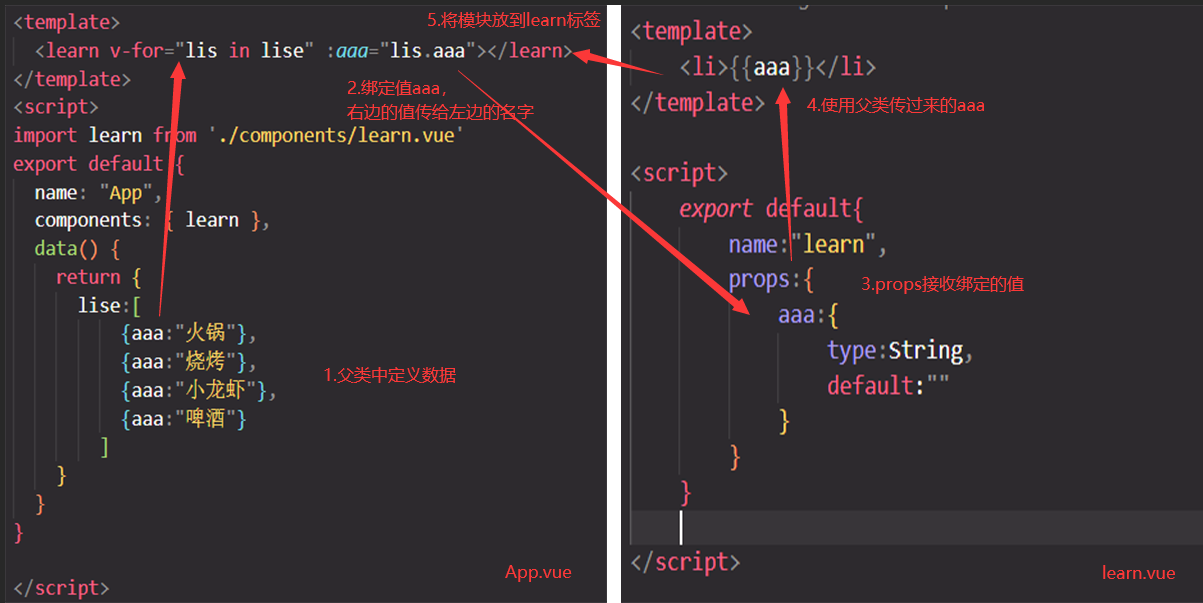
Props组件交互
组件和组件之间是存在交互的,否则完全没有关系
props是你可以在组件上注册的一些自定义attribute
props交互示意图:
1
2
3
4
5
6
7
8
9
10
11
12
13
14
15
16
17
18
19
20
21
22
23
24
25
26
27
28
29
30
31
32
33
34
35
36
37
38
39
| App.vue
<learn :title="title" :names="names"/>
<script>
name:"App",
components: { learn },
data(){
return{
title:"我是一个标题",
names:["LiMing","Jenny","Danny"]
}
}
</script>
learn.vue
<template>
<p>{{title}}</p>
</template>
<script>
export default{
name:"learn",
props:{
title:{
type:String, <!--数组和对象必须使用函数进行返回-->
default:""
},
names:{
type:Array,
default:function(){
return []
}
}
}
}
</script>
|
1
2
3
4
5
6
7
8
9
10
11
12
13
14
15
16
17
18
| <body>
<div id="aaa">
<parent name="张三"></parent>
</div>
</body>
<script src="../js/vue3.js"></script>
<script>
const app = Vue.createApp({
})
app.component("parent",{
props:['name'],
template:'<h4>我的名字是{{name}}</h4>'
})
app.mount("#aaa")
</script>
|
1
2
3
4
5
6
7
8
9
10
11
12
13
14
15
16
17
18
19
20
21
22
23
24
25
26
27
28
| <body>
<ul id="aaa" style="background-color:#80c7ec">
<site v-for="lis in lise" :title="lis.title"></site>
</ul>
</body>
<script src="../js/vue3.js"></script>
<script>
const app = Vue.createApp({
data(){
return{
lise:[
{title:"火锅"},
{title:"烧烤"},
{title:"小龙虾"},
{title:"啤酒"}
]
}
}
})
app.component("site",{
props:['title'],
template: `<li>{{title}}</li>`
})
app.mount("#aaa")
</script>
|
自定义事件组件交互
自定义事件可以在组件中反向传递数据,prop可以将数据从父组件传到子组件,那么反向将数据从父组件传到子组件就可以使用自定义事件$emit
1
2
3
4
5
6
7
8
9
10
11
12
13
14
15
16
17
18
19
20
21
22
23
24
25
26
27
28
29
30
31
32
33
34
35
36
37
38
39
| learn.vue
<template>
<button @click="pao">点击</button>
</template>
<script>
export default{
name:"learn",
data(){
return{
message:"我是learn数据"
}
},
methods:{
pao(){
this.$emit("run",this.message)
}
}
}
</script>
App.vue
<template>
<MyComponent @run="pao">
</template>
import MyComponent from './compents/MyComponent.vue'
export default{
name:"App",
components: { learn },
methods:{
run(date){
console.log(date)
}
}
}
|
slot插槽
默认插槽
子类模板中定义一个slot插槽标签,父类使用组件时会自动将chacao自定义标签内部的标签替换掉子组件中的slot插槽标签
App.vue
1
2
3
4
5
6
7
8
| <template>
<chacao>
<button>按钮</button>
</chacao>
<chacao>
<input type="text"/>
</chacao>
</template>
|
chacao.vue
1
2
3
4
5
6
7
8
9
10
| <template>
<div>
<h2>我是content组件内容</h2>
<div><slot></slot></div>
</div>
</template>
<script>
</script>
|
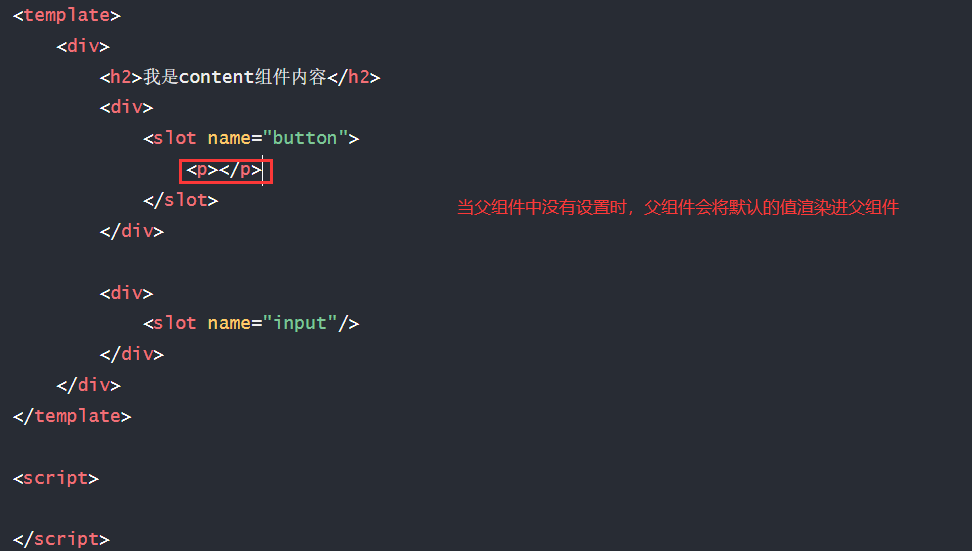
具名插槽
在子组件的插槽标签slot中设置name属性,当父组件替换子标签中的slot会通过template标签中的v-slot属性去寻找对应的name值并完成对应的替换。
App.vue
1
2
3
4
5
6
7
8
9
10
| <template>
<chacao>
<template v-slot:button>
<button>按钮</button>
</template>
<template v-slot:input>
<input type="text">
</template>
</chacao>
</template>
|
changcao.vue
1
2
3
4
5
6
7
8
9
10
11
12
13
14
15
16
17
18
| <template>
<div>
<h2>我是content组件内容</h2>
<div>
<slot name="button">
<p></p>
</slot>
</div>
<div>
<slot name="input"/>
</div>
</div>
</template>
<script>
</script>
|
而没有被设置名字的则会通过设置默认值来进行被父组件的替换
插槽作用域
插槽就是子组件中的提供给父组件使用的一个占位符,用slot表示,父组件可以在这个占位符中填充任何模板代码,如 HTML、组件等,填充的内容会替换子组件的slot标签。插槽显不显示、显示什么结构是由父组件来控制的,而插槽在哪里显示就由子组件来进行控制
App.vue
1
2
3
4
5
6
7
8
9
10
11
12
13
14
15
16
17
18
19
20
21
22
23
24
25
26
27
28
29
30
31
32
33
34
35
36
37
38
39
40
41
42
| <script>
import chacao from './components/chacao.vue'
export default {
name: "App",
components: {chacao},
}
</script>
<template>
<div>
<chacao>
<template v-slot:default="chide"> //v-slot:default用来接收子类传来的数据
<h2>你可以选择吃东西</h2>
<ul>
<li v-for="item in chide.eat">{{item}}</li>
</ul>
</template>
</chacao>
<chacao>
<template v-slot:default="wande">
<h2>你可以选择看玩游戏</h2>
<ul>
<li v-for="item in wande.game">{{item}}</li>
</ul>
</template>
</chacao>
<chacao>
<template v-slot:default="wande">
<h2>你可以选择看电影</h2>
<ul>
<li v-for="item in wande.movie">{{item}}</li>
</ul>
</template>
</chacao>
</div>
</template>
<style>
</style>
|
chacao.vue
1
2
3
4
5
6
7
8
9
10
11
12
13
14
15
16
| <template>
<div><slot :eat="eat" :game="game" :movie="movie"></slot></div>
</template>
<script>
export default{
data(){
return{
eat:['火锅','烧烤','小龙虾','牛排'],
game:['GTA5','地平线','看门狗','使命召唤'],
movie:['盗梦空间','战狼','肖申克的救赎','阿甘正传']
}
}
}
</script>
|
跨级通信
在组建的嵌套中如果单纯使用props会变得非常复杂,因此我们可以使用provide和inject
App.vue
1
2
3
4
5
6
7
8
9
10
11
12
13
14
15
16
17
18
19
20
21
22
23
24
25
26
27
28
29
| <script>
import zi from './components/zi.vue'
export default {
name: "App",
components: {chacao,zi},
data(){
return{
message:"parent",
obj:{
message:"父组件的信息"
}
}
},
provide(){
return{
message:()=>this.message
}
}
}
</script>
<template>
<div>
<zi></zi>
<button @click="message='你好'">改变message</button>
<h2>{{obj.message}}</h2>
</div>
</template>
|
zi.vue
1
2
3
4
5
6
7
8
9
10
11
12
13
14
15
16
17
18
| <template>
<div>
<sun></sun>
</div>
</template>
<script>
import sun from './sun.vue'
export default{
components:{
sun
}
}
</script>
<style>
</style>
|
sun.vue
1
2
3
4
5
6
7
8
9
10
11
12
13
14
15
16
17
18
19
| <template>
<div>
<h2>我是sun组件{{message()}}</h2>
</div>
</template>
<script>
export default{
data(){
return{
}
},
inject:['message']
}
</script>
<style>
</style>
|
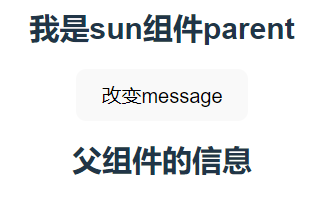 点击后:
点击后: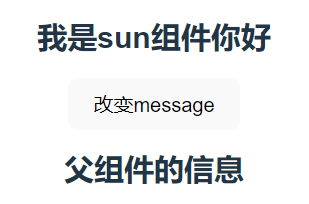
生命周期(钩子函数)
给了用户在不同阶段添加要执行的函数
1、beforeCreate(创建前)
表示实例完全被创建出来之前,vue 实例的挂载元素$el和数据对象 data 都为 undefined,还未初始化。
2、created(创建后)
数据对象 data 已存在,可以调用 methods 中的方法,操作 data 中的数据,但 dom 未生成,$el 未存在 。
3、beforeMount(挂载前)
vue 实例的 $el 和 data 都已初始化,挂载之前为虚拟的 dom节点,模板已经在内存中编辑完成了,但是尚未把模板渲染到页面中。data.message 未替换。
4、mounted(挂载后)
vue 实例挂载完成,data.message 成功渲染。内存中的模板,已经真实的挂载到了页面中,用户已经可以看到渲染好的页面了。实例创建期间的最后一个生命周期函数,当执行完 mounted 就表示,实例已经被完全创建好了,DOM 渲染在 mounted 中就已经完成了。
5、beforeUpdate(更新前)
当 data 变化时,会触发beforeUpdate方法 。data 数据尚未和最新的数据保持同步。
6、updated(更新后)
当 data 变化时,会触发 updated 方法。页面和 data 数据已经保持同步了。
7、beforeDestory(销毁前)
组件销毁之前调用 ,在这一步,实例仍然完全可用。
8、destoryed(销毁后)
组件销毁之后调用,对 data 的改变不会再触发周期函数,vue 实例已解除事件监听和 dom绑定,但 dom 结构依然存在。
Vue引入第三方
安装swiper
1
| 安装指定版本:npm install --save swiper@8.4.1
|
基础实现
1
2
3
4
5
6
7
8
9
10
11
12
13
14
15
16
17
18
19
20
21
22
23
| <template>
<Swiper>
<swiper-slide><img src="../../img/梅西.jpg"></swiper-slide>
<swiper-slide><img src="../../img/C罗.jpg"></swiper-slide>
<swiper-slide><img src="../../img/德布劳内.jpg"></swiper-slide>
<swiper-slide><img src="../../img/莱万多夫斯基.jpg"></swiper-slide>
<swiper-slide><img src="../../img/内马尔.jpg"></swiper-slide>
<swiper-slide><img src="../../img/萨拉赫.jpg"></swiper-slide>
</Swiper>
</template>
<script>
import 'swiper/css'
import { Swiper, SwiperSlide } from 'swiper/vue'
export default {
name:"carousel",
components: {
Swiper,
SwiperSlide,
}
};
</script>
|
添加分页效果
1
2
3
4
5
6
7
8
9
10
11
12
13
14
15
16
17
18
19
20
21
22
23
24
25
26
27
28
29
30
| <template>
<Swiper :modules="modules" :pagination="{clickable:true}">
<swiper-slide><img src="../../img/梅西.jpg"></swiper-slide>
<swiper-slide><img src="../../img/C罗.jpg"></swiper-slide>
<swiper-slide><img src="../../img/德布劳内.jpg"></swiper-slide>
<swiper-slide><img src="../../img/莱万多夫斯基.jpg"></swiper-slide>
<swiper-slide><img src="../../img/内马尔.jpg"></swiper-slide>
<swiper-slide><img src="../../img/萨拉赫.jpg"></swiper-slide>
</Swiper>
</template>
<script>
import 'swiper/css'
import{ Pagination} from 'swiper';
import { Swiper, SwiperSlide } from 'swiper/vue'
import 'swiper/css/pagination'
export default {
name:"carousel",
data(){
return{
modules:[Pagination]
}
},
components: {
Swiper,
SwiperSlide,
}
};
</script>
|
Axios网络请求
什么是Axios
Axios是一个基于promise的异步ajax请求库
安装
1
2
3
4
5
6
7
8
9
| npm install --save axios
post请求参数是需要额外处理的
npm install --save querystring
data:qs.stringify({
})
|
引入
在组件中引用:
1
2
3
4
5
6
7
8
9
10
11
12
13
14
15
16
17
18
19
20
21
22
23
24
25
26
27
28
29
30
31
32
33
34
35
36
37
| <template>
<div>
{{aaa}}
</div>
</template>
<script>
import axios from "axios"
export default {
name:"carousel",
data(){
return{
aaa:""
}
},
mounted() { //挂载后执行
axios({
method:"get",
url:"/src/components/1.txt",
// data:qs.stringify({
// })
}).then(res=>{
this.aaa=res.data
})
}
//简写方法
mounted(){
axios.get("/src/components/1.txt").then(res=>{
this.aaa=res.data
})
}
};
</script>
|
使用全局引用
vue路由
什么是路由
可以让Vue.js构建单页应用实现不刷新跳转变得轻而易举
安装路由
1
| npm install --save vue-router
|
引入、使用路由
1.新建两个文件
1
2
3
4
5
6
7
8
9
10
| HomeView.vue
<template>
<h1>首页</h1>
</template>
AboutView.vue
<template>
<h1>关于</h1>
</template>
|
2.创建配置文件
index.js(在components文件夹中)
1
2
3
4
5
6
7
8
9
10
11
12
13
14
15
16
17
18
19
20
21
22
23
|
import {createRouter,createWebHashHistory} from 'vue-router'
import AboutView from './AboutView.vue'
import HomeView from './HomeView.vue'
const routes=[
{
path:"/about",
component:AboutView
}, {
path:"/home",
component:HomeView
},
]
const router=createRouter({
history:createWebHashHistory(),
routes
})
export default router;
|
3.在入口文件main.js中配置
1
2
3
4
5
6
7
| import { createApp } from 'vue'
import './style.css'
import App from './App.vue'
import router from './luyou'
const app=createApp(App)
app.use(router).mount('#app')
|
4.在页面中使用
1
2
3
4
5
6
7
8
9
10
11
12
13
14
15
16
17
18
19
20
21
| <script>
export default {
name: "App",
}
</script>
<template>
<div>
//router创建超链接,to属性用来指定路径和配置文件的path相匹配
<router-link to="/home">首页</router-link>
<router-link to="/about">关于</router-link>
//用来显示页面内容
<router-view></router-view>
</div>
</template>
<style>
</style>
|
路由传递参数
1.新建两个文件
1
2
3
4
5
6
7
8
9
10
11
12
| HomeView.vue
<template>
<h1>首页</h1>
<p>{{$route.params.ho}}</p> //获取路由中的参数
</template>
AboutView.vue
<template>
<h1>关于</h1>
<p>{{$route.params.ab}}</p>
</template>
|
2.创建配置文件
index.js(在components文件夹中)
1
2
3
4
5
6
7
8
9
10
11
12
13
14
15
16
17
18
19
20
21
22
|
import {createRouter,createWebHashHistory} from 'vue-router'
const routes=[
{
path:"/about/:ab",
name:'about',
component:()=>import('./AboutView.vue')
}, {
path:"/:ho",
name:'home',
component:()=>import('./HomeView.vue')
}
]
const router=createRouter({
history:createWebHashHistory(),
routes
})
export default router;
|
3.在入口文件main.js中配置
1
2
3
4
5
6
7
| import { createApp } from 'vue'
import './style.css'
import App from './App.vue'
import router from './luyou'
const app=createApp(App)
app.use(router).mount('#app')
|
4.在页面中使用
1
2
3
4
5
6
7
8
9
10
11
12
13
14
15
16
17
18
19
20
21
22
23
24
| <script >
export default {
name: "App",
data() {
return {
aaa:prompt('请填写要显示的内容')
}
}
}
</script>
<template>
<div>
<router-link :to="/home/+aaa">首页</router-link> //动态绑定传递数据
<router-link to="/about/这里是关于">关于</router-link>
<router-view></router-view>
</div>
</template>
<style>
</style>
|
嵌套路由配置
1.新建两个文件
1
2
3
4
5
6
7
8
9
10
11
12
13
14
15
16
17
18
19
20
21
22
23
24
25
26
27
28
29
30
| HomeView.vue
<template>
<h1>首页</h1>
<p>{{$route.params.ho}}</p>
<router-link to="/one">分页1</router-link>
<router-link to="/two">分页2</router-link>
<router-view></router-view>
</template>
AboutView.vue
<template>
<h1>关于</h1>
<p>{{$route.params.ab}}</p>
<router-link to="/about/us">关于我们</router-link>
<router-link to="/about/info">关于信息</router-link>
<router-view></router-view>
</template>
AboutInfo
<template>
<h3>关于信息</h3>
</template>
AboutUS
<template>
<h3>关于我们</h3>
</template>
|
2.创建配置文件
index.js(在components文件夹中)
1
2
3
4
5
6
7
8
9
10
11
12
13
14
15
16
17
18
19
20
21
22
23
24
25
26
27
28
29
30
31
32
33
34
35
36
37
|
import {createRouter,createWebHashHistory} from 'vue-router'
const routes=[
{
path:"/about",
name:'about',
component:()=>import('./AboutView.vue'),
children:[{
path:"us",
component:()=>import("./AboutUS.vue")
},{
path:"info",
component:()=>import("./AboutInfo.vue")
}]
}, {
path:"/",
name:'home',
component:()=>import('./HomeView.vue'),
children:[{
path:"one",
component:()=>import("./AboutUS.vue")
},{
path:"two",
component:()=>import("./AboutInfo.vue")
}]
}
]
const router=createRouter({
history:createWebHashHistory(),
routes
})
export default router;
|
3.在入口文件main.js中配置
1
2
3
4
5
6
7
| import { createApp } from 'vue'
import './style.css'
import App from './App.vue'
import router from './luyou'
const app=createApp(App)
app.use(router).mount('#app')
|
4.在页面中使用
1
2
3
4
5
6
7
8
9
10
11
12
13
14
15
16
17
18
19
20
21
22
23
24
| <script >
export default {
name: "App",
data() {
return {
aaa:prompt('请填写要显示的内容')
}
}
}
</script>
<template>
<div>
<router-link :to="/home/+aaa">首页</router-link> //动态绑定传递数据
<router-link to="/about/这里是关于">关于</router-link>
<router-view></router-view>
</div>
</template>
<style>
</style>
|
编程式导航
1
2
3
4
5
6
7
8
9
10
11
12
13
14
15
16
17
18
19
20
21
22
23
24
25
26
27
28
29
30
31
32
33
34
35
36
37
38
39
40
41
42
43
44
45
46
| <template>
<h2>page页面</h2>
<button @click="goPage">点击按钮跳转</button>
</template>
<script>
export default{
methods:{
goPage:function(){
// 跳转导航
this.$router.push("/")
if(123==123){
this.$router.push("/")
}
// 通过传递对象跳转
this.$router.push({path:"/about:654565"})
// 通过name名跳转
this.$router.push({name:"guanyv",params:{id:123546}})
// 设置带?的附加参数
this.$router.push({path:"/about",query:{name:"zhangsan"}})
}
}
}
</script>
<template>
<div>
<h1>关于</h1>
<router-link to="/about/us">关于我们</router-link>
<router-link to="/about/info">关于信息</router-link>
<router-view></router-view>
</div>
</template>
AboutView.vue
<script>
export default{
mounted(){
//在跳转页面可以通过this.$route.query.name拿取数据
console.log(this.$route.query.name);
}
}
</script>
|
替换、前进后退
1
2
3
4
5
6
7
8
|
this.$router.replace({path:"/about",query:{name:"zhangsan"}})
this.$router.forward()
this.$router.go(1)
this.$router.back()
this.$router.go(-1)
|
命名路由和命名视图
指定某个地方分配怎样的路由
1.创建三个组件
1
2
3
4
5
6
7
8
9
10
11
12
13
14
15
16
17
18
19
20
21
22
| shopTop.vue
<template>
<div>
<h3>shop的头部</h3>
</div>
</template>
shopCen
<template>
<div>
<h3>shop的中部</h3>
</div>
</template>
shopFoot
<template>
<div>
<h3>shop的尾部</h3>
</div>
</template>
|
2.在配置文件中指定
1
2
3
4
5
6
7
8
9
10
11
12
13
14
15
16
17
18
19
20
21
22
| import { createRouter, createWebHashHistory } from 'vue-router'
import tou from '../luyou/shopTop.vue'
import zhong from '../luyou/shopCen.vue'
import wei from '../luyou/shopFoot.vue'
const routes = [
{
path:"/shop",
components:{
default:zhong,
tou,wei
}
}
]
const router = createRouter({
history: createWebHashHistory(),
routes
})
export default router;
|
3.页面上渲染App.vue
1
2
3
4
5
6
7
8
9
10
11
| <template>
<div>
<router-link to="/">首页</router-link>
<router-link to="/about">关于</router-link>
<router-link to="/tz">go to</router-link>
<router-view name="tou"></router-view> //指定渲染
<router-view></router-view> //默认渲染
<router-view name="wei"></router-view>
</div>
</template>
|
Vuex状态管理
状态管理可以理解成为更方便的管理组件之间的数据交互
1.下载Vuex
1
| npm install vuex@next --save
|
2.设置配置文件
1
2
3
4
5
6
7
8
9
10
11
12
13
14
15
16
17
18
19
20
21
22
23
24
25
26
27
28
29
30
31
32
| import {createStore} from 'vuex'
import axios from 'axios'
export default createStore({
state(){
return{
count:0
}
},
getters:{
getCounter(state){
return state.count>0 ? state.count : "内容小于0,不予显示"
}
},
mutations:{
addCounter(state,num){
state.count+=num
}
},
actions:{
asyn({commit}){
axios.get("http://iwenwiki.com/api/generator/list.php").then(res=>{
commit("addCounter",res.data[0])
})
}
}
})
|
3.在入口文件中引入
1
2
3
4
5
6
7
8
| import { createApp } from 'vue'
import './style.css'
import App from './App.vue'
import router from './router/index'
import store from './store'
const app=createApp(App)
app.use(store).use(router).mount('#app')
|
4.在页面上使用
1
2
3
4
5
6
7
8
9
10
11
12
13
14
15
16
17
18
19
20
21
22
23
24
25
26
27
28
29
30
31
32
33
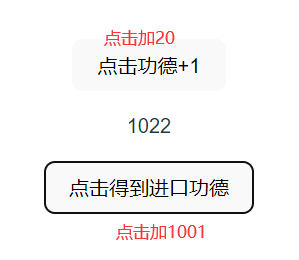
| <template>
<div>
<button @click="addClickHandle">点击功德+1</button>
<p>{{ $store.state.count }}</p>
<button @click="addas">点击得到进口功德</button>
</div>
</template>
<script >
// vuex提供的mapState快捷读取方式
import { mapState,mapGetter,mapActions} from 'vuex';
export default {
name: "App",
computed: {
//把各个数据和方法引入到这里
...mapState(['count']),
...mapGetters(['getCounter'])
...mapActions(["asyn"])
},
methods: {
addClickHandle() {
// 固定调用方式,可以选择添加或者不添加参数
this.$store.commit("addCounter",20) //使用store.commit方法调用mutations的addCounter函数
},
addas(){
this.$store.dispatch("asyn") //使用dispatch方法调用actions的asyn方法
}
}
}
</script>
<style>
</style>
|